Install AT&T internet – NVG510
You’re viewing instructions for
Internet equipment
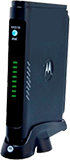
Motorola
NVG510
KM1205121-slctrgrp_motonvg510
Install Internet
Before installation, check to be sure you have all information and materials:
- Service activation date – You can only connect to the Internet after 2:00 p.m. on the date specified on your confirmation letter or packing slip.
- Other service providers – If you have a security system, health alarm, or water meter monitor, you’ll need special assistance. You should contact AT&T to schedule an appointment or your monitoring service provider for instructions.
- Account information – All customers need your AT&T Internet telephone/account number and your passcode that was sent by mail, email, or given to you by an AT&T representative. Existing customers need your AT&T email address (Member ID) and password.
- Installation kit – This includes your gateway, filters, and necessary cables to get connected.
- Wi-Fi information – This includes your Wi-Fi network name and password found on the side of your Wi-Fi gateway.
Connect your filters and cables
If you don’t have business phone service, you can start with Step 4.
- Install single port filters on any wall jacks being used except for the wall jack being used by the modem.
- Install a dual-port filter on the wall jack used by the gateway.
- Connect a phone cable between the phone jack and the phone or device sharing the dual port filter.
- Connect the green data cable to your wall jack or the DSL/HPNA port on the dual port filter and the DSL/Broadband port on the gateway.
- Connect the yellow Ethernet cable to the Ethernet port on the modem and the Ethernet port on your PC.
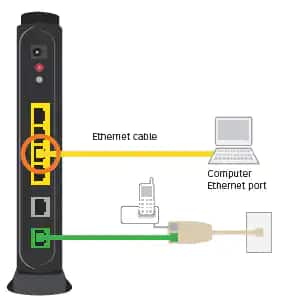
- Connect the black power adapter to the power port on the gateway.
- Plug the power cord into an electrical outlet.
Your gateway will power up. Wait for the Power, Broadband, and Service lights to turn solid green and for the Ethernet light to blink green. Do not unplug the power adapter or data cable while the modem powers up. This can damage the gateway.
Register and activate your account
When registering, enter the following information:
- AT&T Internet telephone number/account number found on your confirmation letter or packing slip.
- AT&T Member ID and password.
- Security questions and answers (new users only).
The online registration process should start automatically. If it doesn’t, follow these steps:
- Open a Chrome, Firefox, Internet Explorer, or other Internet browser.
- Enter att.net/uverse in the address field.
- Select Enter and, when prompted, turn off any security or firewall software to allow the network connection.
- Complete the activation and registration by following the remaining on screen instructions.
Connect to Wi-Fi
In just a few steps, connect to your new Wi-Fi network:
- Open your computer or device’s Wireless Network settings and refresh the network list.
- Select your Wi-Fi network name, found on the side of your gateway, from the list.
- Enter your 10-digit Wi-Fi password, the 10-digit key on the side of your gateway, to connect to your network.
Once connected, the Wireless light on your gateway will turn solid green.
Get your network information
Your Wi-Fi name and password can be found on your Wi-Fi gateway or through the gateway settings screen on a computer or device connected to your Wi-Fi network. Use your device label to find Wi-Fi information that hasn’t changed. Use the gateway settings screen if you, or someone else, changed your Wi-Fi information.
Wi-Fi gateway
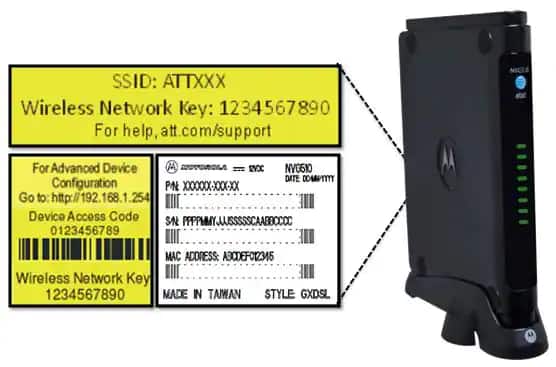
On the side of your gateway there is a sticker with the original Wi-Fi settings and information.
- The Wi-Fi name is ATT followed by the last 7 digits of the gateway serial number (SN), or the name printed by SSID.
- The Wi-Fi password is the 12-digit number labeled Wireless Network Key. (Mac OSX users may need to enter a $ character at the beginning of the Wi-Fi password.)
Gateway settings screen
You can also get your Wi-Fi information from a computer or device connected to your Wi-Fi network. This is useful if you, or someone else, have changed your Wi-Fi network name or password.
- Open Chrome, Firefox, Internet Explorer, or other browser window.
- Enter http://192.168.1.254 in the address bar.
- Locate the Wireless section.
- The Wi-Fi network name is the Network ID.
- The Wi-Fi password is the Network Key.
Wi-Fi network name and password change
Your Wi-Fi gateway comes with a default Wi-Fi network name and password. Change your network information to make it easier to remember (but don't use personal info like your name or address) and to protect your network from unwanted users.
- Open a Chrome, Firefox, Internet Explorer, or other browser window.
- Enter http://192.168.1.254 in the address bar.
- Select Home Network > Wireless.
- Change the desired information:
- Wi-Fi name: In the Network Name (SSID) field, enter a new Wi-Fi network name.
- Wi-Fi password: From the Security drop-down select WPA – Custom, then in the Key field enter a custom password.
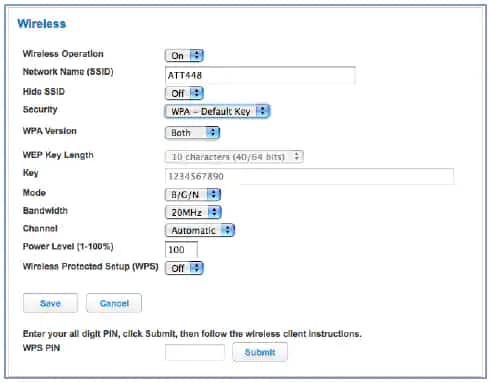
- Select Save.
- If required, enter the Device Access Code found on the side of your gateway in the Password field.
- Select Submit.
Once you have successfully changed your Wi-Fi network name and password, you’ll need to reconnect all your Wi-Fi devices using the new network information.
