In this tutorial, you will learn how to:
• Turn Wi-Fi on or off
• Quickly turn Wi-Fi on or off
• Connect to a Wi-Fi network
• Remove a Wi-Fi network
Turn Wi-Fi on or off
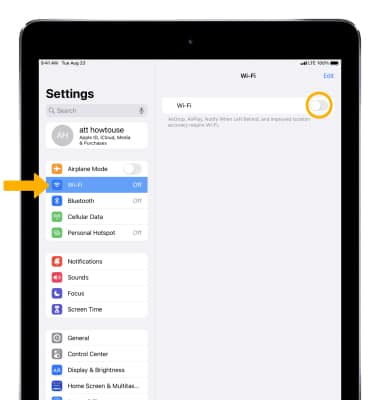
1. From the home screen, select the ![]() Settings app.
Settings app.
2. Select Wi-Fi, then select the ![]() Wi-Fi switch to turn on or off.
Wi-Fi switch to turn on or off.
Note: To optimize battery life, turn Wi-Fi off when not in use.

Quickly turn Wi-Fi on or off
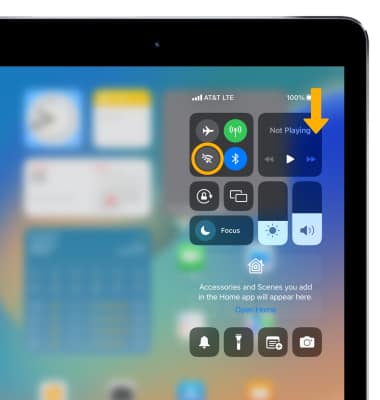
Swipe down from the upper right corner of the screen to access the Control Center, then select the Wi-Fi icon.

Connect to a Wi-Fi network
1. When Wi-Fi is turned on, the device will search for networks automatically. Select the desired Wi-Fi network.
Note: If connecting to a secure network, enter the Wi-Fi network password then select Join. Secure networks will display with a Lock icon. To connect to a hidden or unbroadcasted Wi-Fi network select Other.... You will need to enter the Network Name (SSID), Security, and Password (if necessary) to continue.

2. When iPad is connected to a Wi-Fi network, the Wi-Fi icon ![]() will be displayed in the Status bar.
will be displayed in the Status bar.
Note: Data transmitted over a Wi-Fi network does not count toward your AT&T data plan, and will not be billed. To manage whether your device automatically switches from a poor or unstable Wi-Fi network to the AT&T network to maintain a consistent data connection, select the Settings app > Cellular > scroll to and select the Wi-Fi Assist switch to turn it on or off. When using the AT&T network, data rates apply.
Remove a Wi-Fi network
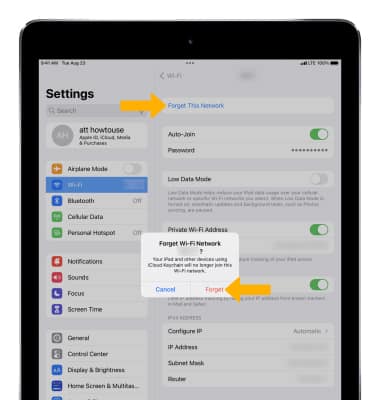
1. From the Wi-Fi screen, select the ![]() Info icon next to the desired network.
Info icon next to the desired network.
2. Select Forget This Network, then select Forget to confirm.
Note: Learn more from the Apple support article Connect to Wi-Fi on your iPad. If you can't connect to a Wi-Fi network, click here.

