In this tutorial, you will learn how to:
• Add another Cell Booster
• Edit device name
• View additional settings
• Performance reports
• User list
• Admin list
• Update notifications (email and SMS)
Add another Cell Booster
1. From the Home screen, select the desired location.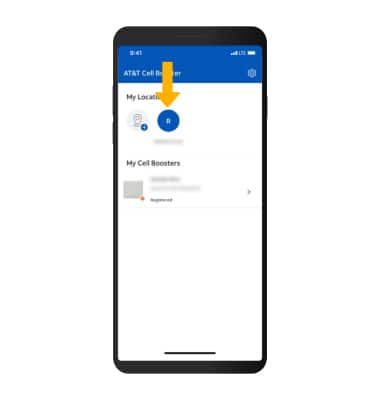
2. Select the Add icon.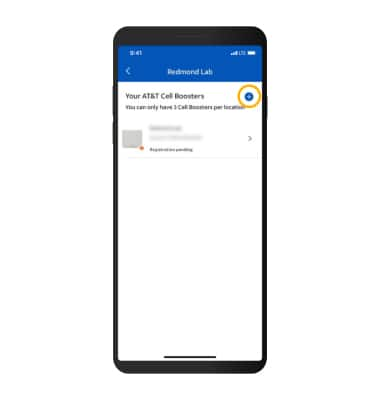
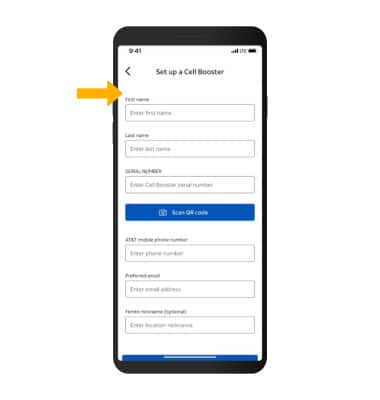
3. Follow the prompts to set up the additional Cell Booster.
Note: To learn more, see the Activate & Register tutorial.
Edit device name
1. From the Home screen, select the desired Cell Booster then select Edit.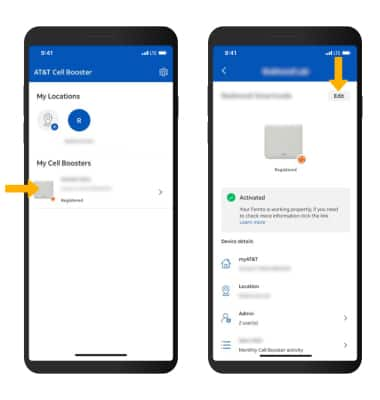
2. Edit the device name as desired, then select Save.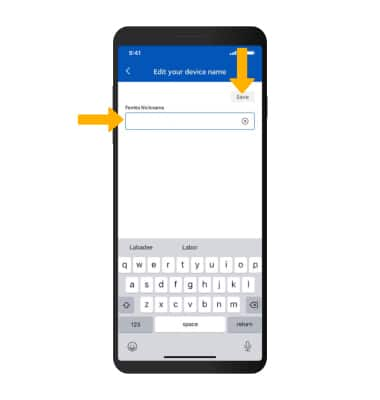
View additional settings
From the Home screen, select the Settings icon. Additional settings will be displayed.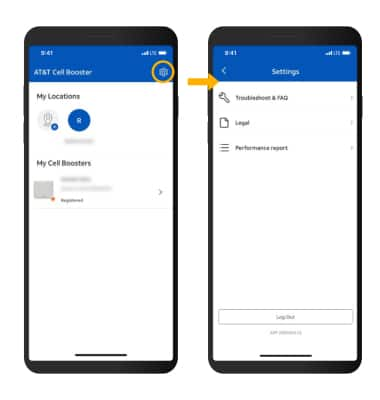
Performance reports
Customers that activate an AT&T Cell Booster Pro will have access to view performance reports. This feature allows customers to see a 13-month report that displays wireless usage for that Cell Booster Pro Performance Reports will only be displayed for Cell Booster Pro and not available for Cell Booster. To access the performance reports, from the Home page, click Settings > Performance Reports.
User list
For adding and removing users, please click here.
Admin list
This app/portal admin feature allows multiple people to have access to status and management of a designated Cell Booster device. The initial customer registering the device can add an additional user as an admin. Each added admin can add/delete users as well. Anyone added as an admin will have the same permission levels and view access to the designated Cell Booster. Additional admins will also receive customer notifications and SMS (if they opt-in).
Steps for adding an Admin to the AT&T Cell Booster Pro:
1. Select the Cell Booster device under the Home Page by clicking on the right arrow
2. Once device is selected, select the “Admin list” under Device Details
3. Click on the blue '+' sign on the top right of the screen to add an admin
4. Fill out all the fields, that include:
• Login ID (this is the Username/User ID used to Sign into app/portal)
• First Name
• Last Name
• Phone Number
• Contact Email
Recommend the customer to have SMS and Email Notifications turned ‘ON’. Click ‘Save’. An ‘Admin Added’ screen will appear and will now be listed under ‘Admin List’.
Updating Notification Settings (email and SMS)
Users have the option to enable/disable email and SMS notifications that are sent during Cell Booster activation and even post activation if device movement is detected. Notifications will be defaulted to “On” for the user that is registering the Cell Booster device.
1. To Update settings, select the Cell Booster device under the Home Page by clicking on the right arrow.
2. Once the device is selected, select the “Admin list” under Device Details.
3. Select the admin user for which to update settings by clicking on the right arrow next to the user.
4. At the bottom of the page, user will see “SMS Notifications” and “Email Notifications” with a On/Off Toggle. User can move toggle to “Off “ for either Email Notification or SMS Notifications. This step can be repeated for each Admin User listed.
Note: Any secondary admin users added will automatically have Email and SMS Notifications set to “Off” and user will need to set to “On” if the additional user wants to receive notifications.
