Take a Picture
Learn how to take a picture, use the front and rear camera, switch between camera and modes, and more.
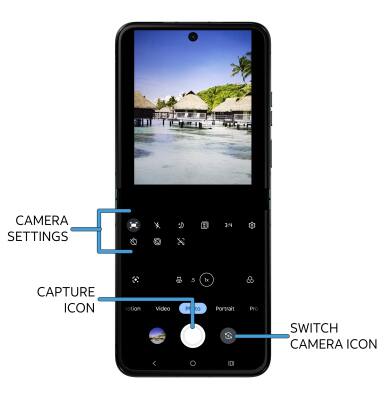
![]()
In this tutorial, you will learn how to:
• Switch between front and rear camera
• Focus the camera
• Zoom in and out
• Take a photo
• Access and use Spot Color
• Access and use Pro mode
• Use Dual Capture
• Use Built-in Tripod
This tutorial requires you open the Camera app. To access the camera from the home screen, select the ![]() Camera app.
Camera app.
Switch between front and rear camera
Select the Switch camera icon.

Focus the camera
Select the desired area of the photo you wish to focus on. A circle will appear when the area is selected.

Zoom in and out
Move two fingers apart towards the edge of the screen to zoom in. Move two fingers inward towards the middle of the screen to zoom out.
Note: Zoom out all the way to 0.5X to capture Ultra-wide angle photos and videos.

Take a photo
Select the Capture icon.
Note: Alternately, you can take a picture by pressing one of the Volume buttons.

Access and use Spot Color
Spot Color allows you to choose one color and turn the rest of the photo black and white. To access the Spot Color feature, swipe left to More then select Spot Color. Select the desired area of the photo to choose a color, then select and drag the slider left or right to adjust the amount of black and white.

Access and use Pro mode
Pro allows you to manually adjust settings such as ISO, shutter speed and exposure levels. To access Pro mode, from the camera screen, swipe left to Pro. Adjust settings as desired.

Use Dual Capture
1. Dual Capture can capture one picture using two cameras. From the Camera app, swipe left to More then select Dual Capture.

2. Select the Switch icon on the bottom left corner to change the selfie photo camera to the front-facing camera.

3. To change the camera view, select the Layout icon then select the desired viewing option.

Use Built-in Tripod
The motorola razr's camera can be used whether the device is open or closed. It can even be used when the device is folded with Built-in Tripod. Built-in Tripod can be used to stabilize your shots without a tripod. The bottom half of your screen will display all the camera controls while the top half will be the camera's viewfinder. Select the desired options:
• SWITCH CAMERA: Select the Switch camera icon.
• TAKE A PHOTO: Select the Capture icon.
• CAMERA SETTINGS: Select and adjust the settings as desired.