Send & Receive Messages
In this tutorial, you will learn how to:
• Access messages
• Compose & send a message
• Read & respond to a new message
• Pin a message thread
• Delete a message
When a new message is received, the ![]() New Message icon will display in the Notification bar.
New Message icon will display in the Notification bar.
Access messages
From the home screen, select the  Messages app.
Compose & send a message
1. Select the Start chat icon. Select the 'To' field, then enter or select the desired recipient.
Note: To create a Group Message, select Create group under the 'To' field. Select all desired contacts. When finished, select Next to name and create the group. To remove recipients, select the Minus icon to delete the desired contact(s).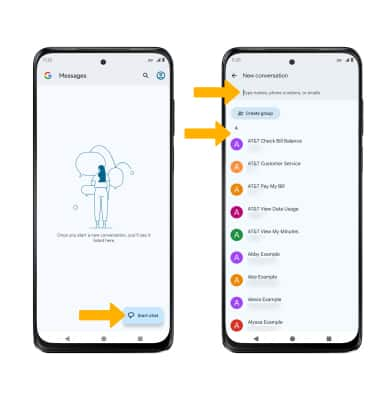
2. Compose and send a message using the following options as desired: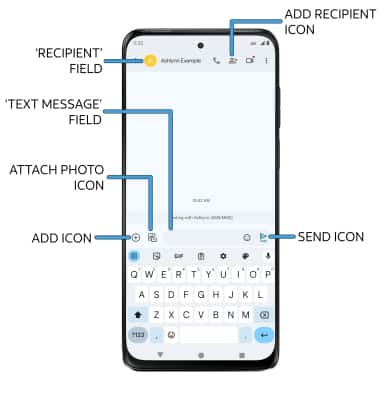
• ENTER RECIPIENT: Select the 'Recipient' field to enter a recipient. Select the Add recipient icon to select a recipient in your Contacts list.
• ENTER MESSAGE: Select the 'Text message' field, then enter the desired message.
• ADD ATTACHMENT: Select the Add icon to attach a GIF, sticker, location, contact, or file. Select the Attach photo icon to attach a photo from the gallery or to take a picture.
• SEND A MESSAGE: When finished composing a message, select the Send icon to send the message.
Note: If Advanced Messaging is turned on and you are messaging another device using the most recent version of Advanced Messaging (2019) from AT&T, you can share files up to 100MB, get read receipts, and see when someone is replying. If Advanced Messaging is turned off you can share files up to 1 MB. To learn more, visit Advanced Messaging.
Read & respond to a new message
From the Messaging inbox, select the desired message thread.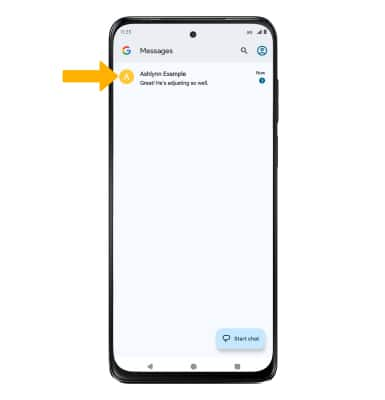
VIEW/SAVE AN ATTACHMENT: To view an attachment, select the desired attachment. To save an attachment, select and hold the desired then select the download icon.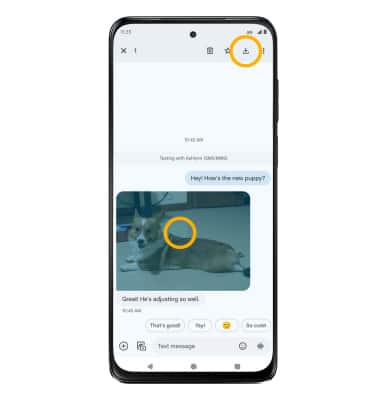
RESPOND TO A MESSAGE: Select the desired option.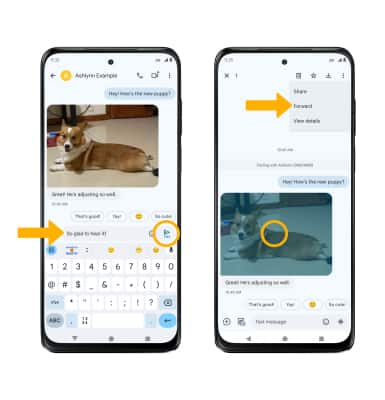
• REPLY: Enter the desired message in the 'Text message' field, then select the Send icon.
• FORWARD: Select and hold the desired message > ![]() Menu icon > Forward and follow the prompts to forward a message.
Menu icon > Forward and follow the prompts to forward a message.
Pin a message thread
From the Messaging screen, select and hold the desired message thread, then select the Pin icon.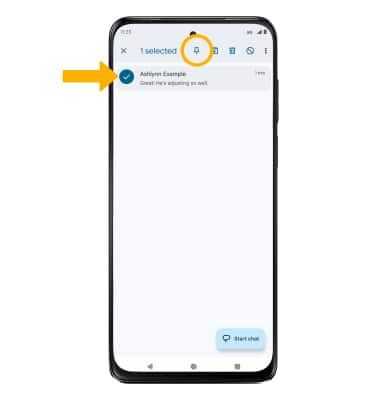
Delete a message
From the desired message thread, select and hold the desired message, then select the ![]() Delete icon. Select Delete again to confirm.
Delete icon. Select Delete again to confirm.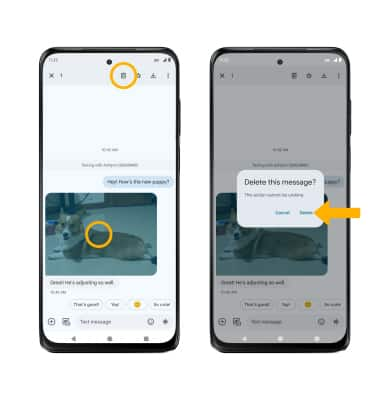
DELETE MESSAGE THREAD: From the Messaging screen, select and hold the desired message thread, then select the ![]() Delete icon. Select Delete to confirm.
Delete icon. Select Delete to confirm.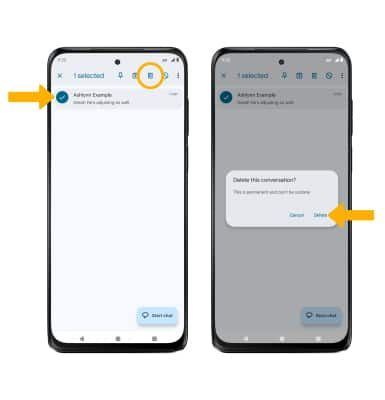
Tips
By default, attachments will be saved to the Messages folder in the Photos app. To view saved attachments, from the home screen, select the ![]() Photos app > Library tab > Messages.
Photos app > Library tab > Messages.