Available Storage
Which device do you want help with?
Available Storage
Learn how to check available device storage, free up memory, remove unused apps, or clear app data.
INSTRUCTIONS & INFO
This device is available with 32GB of internal memory and the option to add a MicroSD card (sold separately) up to 128GB. Purchase an SD memory card to expand your device memory.
In this tutorial, you will learn how to:
• View available storage
• Free up storage
• Remove unused apps
• Clear app data
• Add storage
• Format an SD Card
View available storage
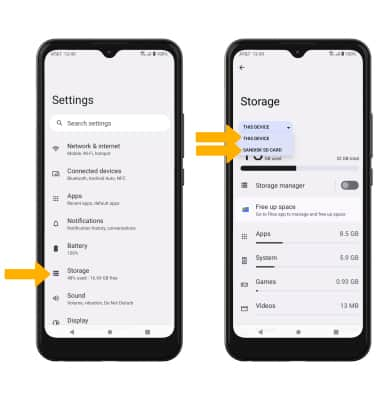
1. Swipe down from the Notification bar with two fingers, then select the  Settings icon.
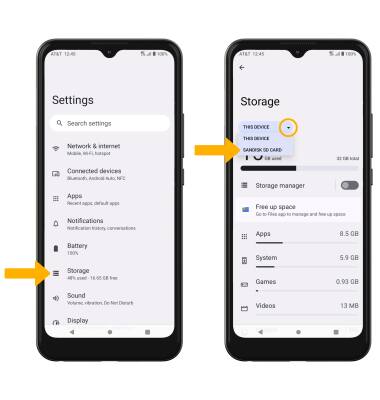
2. Select Storage. Available storage will be listed under THIS DEVICE. Select the THIS DEVICE drop-down icon, then select SANDISK SD CARD to view available memory card space.
Free up storage
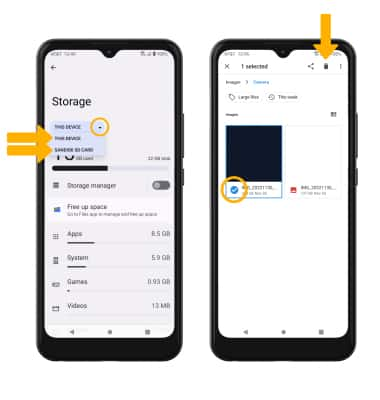
From the Storage screen, select the drop-down icon, then select the desired storage location. Navigate to, then select and hold the desired content. Select the  Delete icon.
Note: You will be prompted to select OK to confirm.
Note: You will be prompted to select OK to confirm.
Remove unused apps
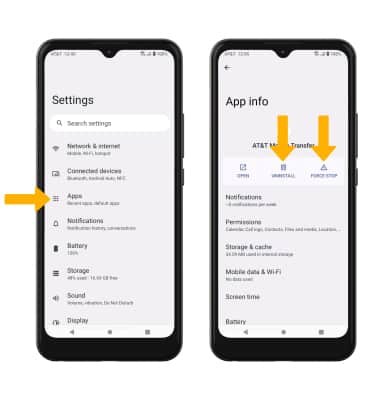
From the Settings screen, select Apps > SEE ALL APPS > desired app. From here, you may UNINSTALL or FORCE STOP the app.
Clear app data
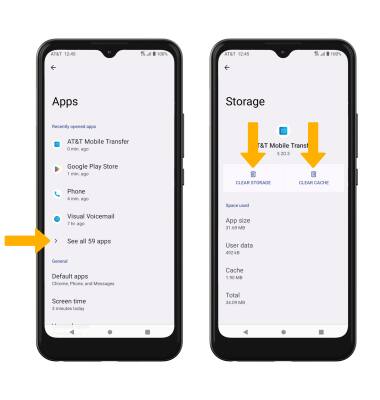
From the Apps & notifications screen, select See all apps > desired app > Storage & cache > CLEAR STORAGE or CLEAR CACHE.
Format an SD card
1. When you insert an SD card for the first time, it is recommended that you format it on your phone. From the home screen swipe down from the Notification bar with two fingers, then select the  Settings icon. Select Storage > THIS DEVICE drop-down icon > SANDISK SD CARD.
Note: Formatting your SD card will erase all files on the card and the card will be formatted for use on your phone. Make sure you backup your files to another location before formatting your SD card.
2. Select the Menu icon > Format > FORMAT SD CARD.
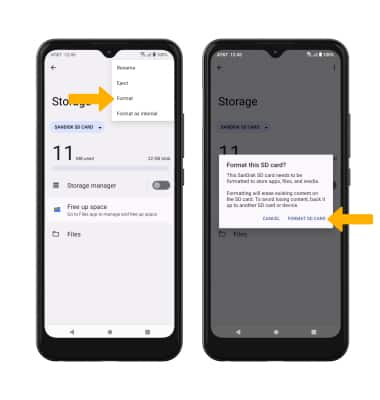
Note: Formatting your SD card will erase all files on the card and the card will be formatted for use on your phone. Make sure you backup your files to another location before formatting your SD card.

2. Select the

Add storage
Purchase an SD card or download a cloud storage app from the  Play Store app.
Note: To mount an SD card, from the home screen, swipe down from the Notification bar with two fingers, then select the  Settings icon > Storage > SD Card > MOUNT. To unmount your memory card, from the Storage screen, select the
  Menu icon then select the
  Eject icon. For information on storing data to a memory/microSD card, visit the Backup & Restore with a Memory Card tutorial.
 Menu icon then select the